Checking Oceanic Clearances

Request Data
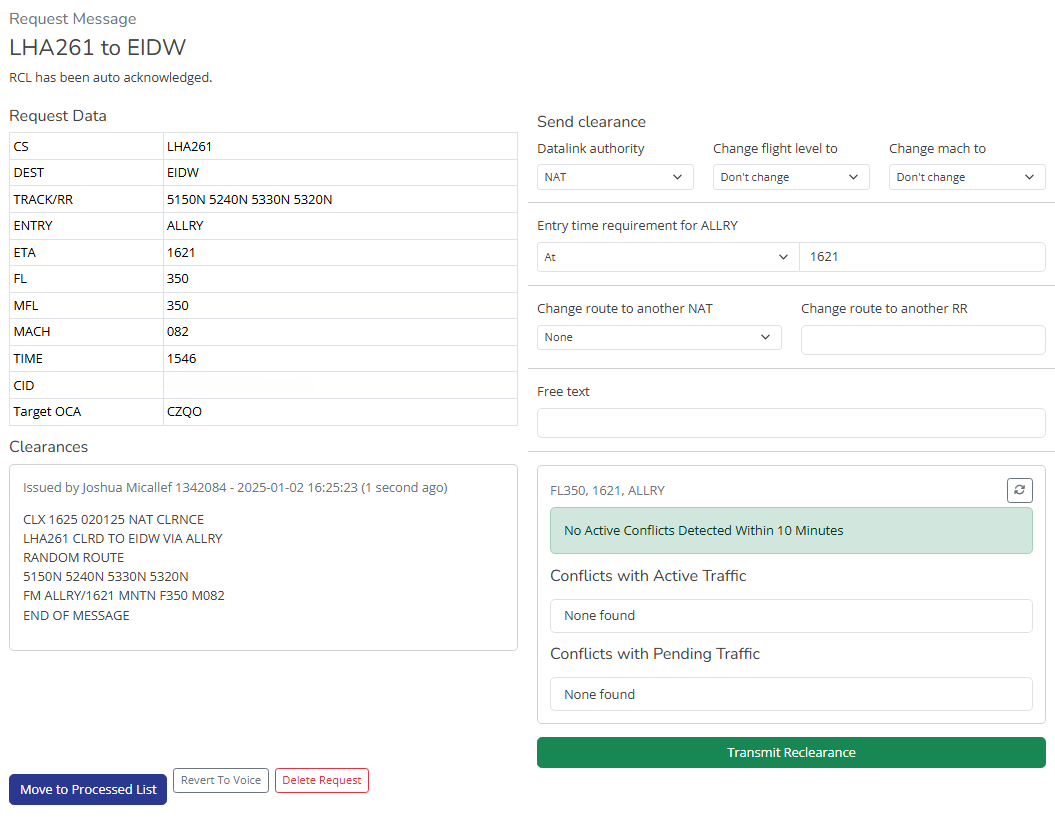
The request data will show:
- Callsign - CS
- Destination ICAO - DEST
- Route - TRACK or RR
- ENTRY - entry fix
- ETA - entry ETA
- FL - requested FL
- MFL - maximum FL
- MACH - requested mach
- TIME - Time clearance was requested
- CID - User Name and CID
- Target OCA - Which station has the pilot selected
Issuing a Reclearance
Here you can issue restrictions or change flight level/mach.
NOTE: Changes to Oceanic Clearances on VATSIM have resulted in Clearance Requests being sent an automatic acknowledgement. Only issue a Reclearance if a conflict exists and you need to ammend their requested track. Read the Announcement here.
Datalink authority
This is the oceanic sector issuing the clearance. It should auto populate with your active sector providing you are logged into VATSIM correctly. If it cannot auto detect your sector, it will default to NAT bandbox. You may change this if you need.
Flight level, mach number
You can use the dropdowns to change the flight level/mach for the clearance. The pilot's request and maximum FL will be highlighted in the dropdown menu. Don't use these dropdowns unless you are deviating from the request.
Entry time requirement for XXXXX
Use this to issue an entry time requirement for their entry fix. Format it as PASS XXX NOT BEFORE 1000Z for example.
Route Changes
You can change the NAT Track used by the Pilot, or input a different Random Routing in this section.
Free text
Are their any extra details that need to be sent? This is not usually needed.
Pilot CID
Displayed is the pilot Name and CID in case you need to contact them via the network to confirm any details.
Conflict Detection Tool
The conflict detection tool ensures that no Lateral or Vertial conflicts will occur within 10 minutes from the Entry Point. This only shows aircraft which have requested shown as pending or been cleared shown as active.
[Move to Processed List]
After reviewing the request, and you are satisfied that there is no conflicts, you then need to move the Clearance into the Processed List. This will then allow for the Conflict Detection Tool to ensure that no conflicts will exist with other aircraft when requesting Oceanic Clearance.
[Transmit Reclearance]
This button will send the reclearance to the pilot. It will reject your submission if you filled out the form incorrectly in one way or another.
NOTE: As mentioned above, only issue a reclearance if there is a genuine need to change a Pilots clearance. Auto Acknowledgement will issue the pilot a clearance based of their request.
[Delete]
This will delete the request if the pilot has disconnected or has put in an incorrect request and is going to refile. Do not use the delete button unless one of these situations has occured.
What next?

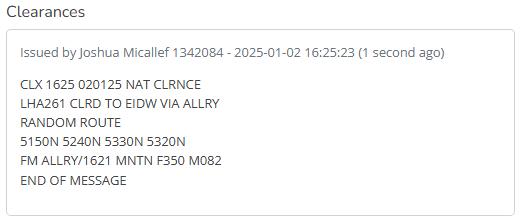
The reclearance you just issued will be displayed below the Clearances section on the left hand side.
NOTE: Make sure to always press
Move to Processed Listat the completion of each check of a clearance request.
You can now close this request. If you need to reopen this request to issue any changes in the future, you can access it via the Processed Messages tab.